Openstack With DevStack
Devstack with Vagrant
ตัวอย่าง file vagrant สำหรับการทดสอบ devstack
# -*- mode: ruby -*-
# vi: set ft=ruby :
$script = <<SCRIPT
sudo dnf update -y
SCRIPT
Vagrant.configure("2") do |config|
config.vm.box = "fedora/24-cloud-base"
config.vm.provision :shell, :inline => "echo root:password | chpasswd"
config.vm.provision :shell, :inline => $script
config.vm.define :devstack1 do |node|
node.vm.hostname = "devstack1.example.com"
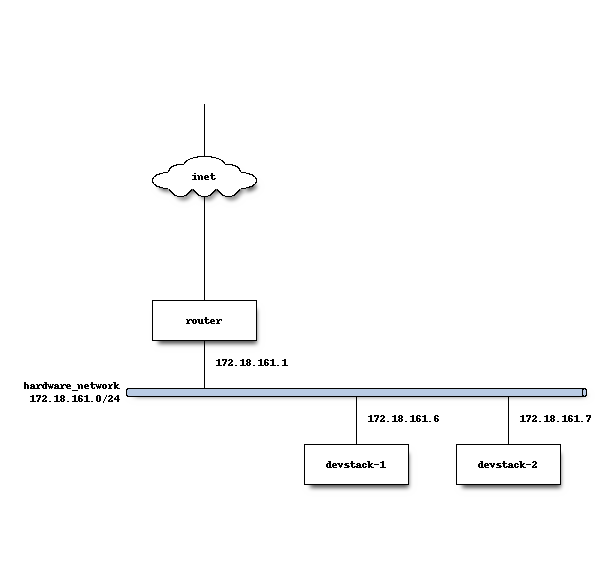
node.vm.network :private_network, :ip => "172.18.161.6"
node.vm.provider :libvirt do |domain|
domain.uri = 'qemu+unix:///system'
domain.driver = 'kvm'
domain.memory = 8192
domain.cpus = 2
domain.nested = true
domain.volume_cache = 'none'
domain.storage :file, :size => '20G'
end
end
config.vm.define :devstack2 do |node|
node.vm.hostname = "devstack2.example.com"
node.vm.network :private_network, :ip => "172.18.161.7"
node.vm.provider :libvirt do |domain|
domain.uri = 'qemu+unix:///system'
domain.driver = 'kvm'
domain.memory = 8192
domain.cpus = 2
domain.nested = true
domain.volume_cache = 'none'
end
end
end
Download complete file Vagrantfile2
from http://docs.openstack.org/developer/devstack/guides/neutron.html
Install Devstack
หลังจาก ที่เราได้ทำการ vagrant up server1 เรียบร้อยแล้ว vm นี้มีขนาด RAM 8 Gb เพื่อใช้การทดสอบ
openstack ทดสอบโดยการสร้าง Directory สำหรับการทดสอบ Devstack และ ให้ Download หรือ สร้าง
file Vagrant จากตัวอย่างด้านบน
mkdir ~/Devstack
cd ~/Devstack
wget https://thaiopen.github.io/sipacloudcourse/_downloads/Vagrantfile2
mv Vagrantfile2 Vagrantfile

## ssh to vagrant
vagrant up
## ssh to instance โดยการใช้ ชื่อที่กำหนดใน define
vagrant ssh devstack1


## check vm support virtualization
egrep -c '(vmx|svm)' /proc/cpuinfo
2

## change to root
sudo su -
useradd -d /opt/stack stack
echo "stack ALL=(ALL) NOPASSWD: ALL" >> /etc/sudoers

## default devstack logical volume 'stack-volumes'
dnf install lvm2
pvcreate /dev/vdb
vgcreate stack-volumes /dev/vdb

## list logical volume with 'vgs'
vgs

exit

## on normal vagrant user
sudo dnf update -y
sudo dnf install git -y
git clone https://git.openstack.org/openstack-dev/devstack
cd devstack
create local.conf
การใช้งานการปรับแต่ง devstack จะขึ้นกับรายละเอียดที่ระบุไว้ใน local.conf
[[local|localrc]]

## Recloning will insure that your stack is up to date
#RECLONE=yes

## Run with no internet Access
#OFFLINE=True

## Ip config base on structure
HOST_IP=172.18.161.6
SERVICE_HOST=172.18.161.6
MYSQL_HOST=172.18.161.6
RABBIT_HOST=172.18.161.6
GLANCE_HOSTPORT=172.18.161.6:9292
## password
ADMIN_PASSWORD=secret
DATABASE_PASSWORD=secret
RABBIT_PASSWORD=secret
SERVICE_PASSWORD=secret

### Enable Service

## Do not use Nova-Network
disable_service n-net

## Enable Neutron (Network)
enable_plugin neutron https://git.openstack.org/openstack/neutron
ENABLED_SERVICES+=,q-svc,q-agt,q-dhcp,q-l3,q-meta,q-metering,q-qos


## Neutron options
Q_USE_SECGROUP=True
FLOATING_RANGE="172.18.161.0/24"
FIXED_RANGE="10.0.0.0/24"
Q_FLOATING_ALLOCATION_POOL=start=172.18.161.245,end=172.18.161.254
PUBLIC_NETWORK_GATEWAY="172.18.161.1"
PUBLIC_INTERFACE=eth1

## Open vSwitch provider networking configuration
Q_USE_PROVIDERNET_FOR_PUBLIC=True
OVS_PHYSICAL_BRIDGE=br-ex
PUBLIC_BRIDGE=br-ex
OVS_BRIDGE_MAPPINGS=public:br-ex

## Enable VPN plugin for neutron
enable_plugin neutron-vpnaas https://git.openstack.org/openstack/neutron-vpnaas

## Enable Firewall plugin for neutron
enable_plugin neutron-fwaas https://git.openstack.org/openstack/neutron-fwaas

## Enable Load Balancer plugin for neutron
enable_plugin neutron-lbaas https://git.openstack.org/openstack/neutron-lbaas
ENABLED_SERVICES+=,q-lbaasv2

#enable_plugin octavia https://github.com/openstack/octavia.git
#ENABLED_SERVICES+=,octavia,o-cw,o-hk,o-hm,o-api

## Swift

SWIFT_HASH=66a3d6b56c1f479c8b4e70ab5c2000f5
SWIFT_REPLICAS=1
SWIFT_DATA_DIR=$DEST/data
enable_service s-proxy s-object s-container s-account


## Enable Ceilometer (Metering)
enable_plugin ceilometer https://git.openstack.org/openstack/ceilometer
#enable_plugin gnocchi https://github.com/openstack/gnocchi
enable_plugin aodh https://git.openstack.org/openstack/aodh
enable_service ceilometer-acompute
enable_service ceilometer-alarm-notifier
enable_service ceilometer-alarm-evaluator

### PLUGINS

# Enable Sahara (Data Processing)
enable_plugin sahara git://git.openstack.org/openstack/sahara

# Enable Trove (Database)
enable_plugin trove git://git.openstack.org/openstack/trove

## Enable Heat
ENABLED_SERVICES+=,heat,h-api,h-api-cfn,h-api-cw,h-eng

CEILOMETER_BACKEND=mongodb
CEILOMETER_NOTIFICATION_TOPICS=notifications,profiler


IMAGE_URLS+="http://cloud.centos.org/centos/7/images/CentOS-7-x86_64-GenericCloud.qcow2"
สามารถ download ได้ที่ Vagrantfile2
run stack.sh:
wget https://thaiopen.github.io/sipacloudcourse/_downloads/local2.conf
mv local2.conf local.conf
./stack.sh
script stack.sh จะทำการ download source code จาก github และมาติดตั้งให้เองอัตโนมัติ
โดยdownload มาเก็บไปใน /opt/stack และผลลัพท์ที่ได้ จะสามารถใช้งาน openstack ได้ทันที
=========================
DevStack Component Timing
=========================
Total runtime 5440
run_process 84
test_with_retry 4
pip_install 742
restart_apache_server 18
wait_for_service 13
yum_install 1219
git_timed 1911
=========================
This is your host IP address: 172.18.161.6
This is your host IPv6 address: ::1
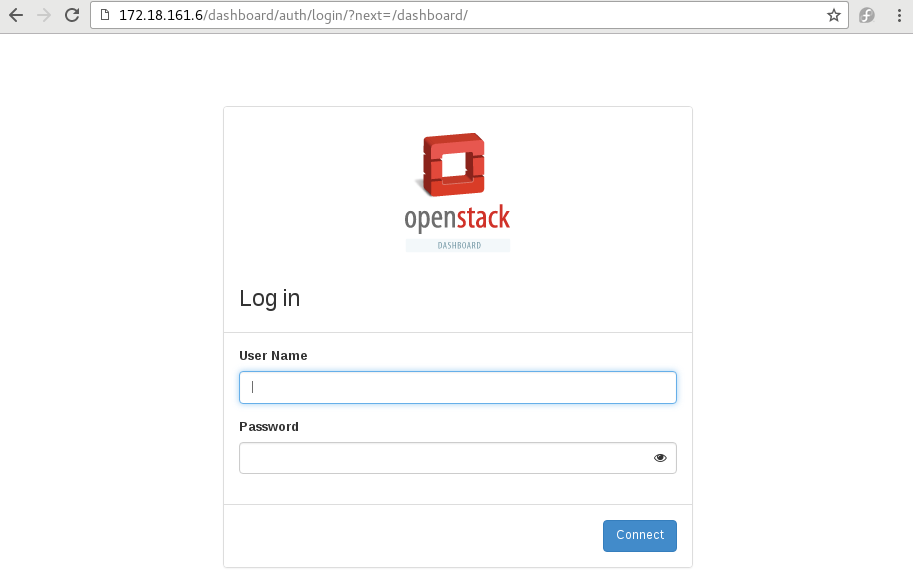
Horizon is now available at http://172.18.161.6/dashboard
Keystone is serving at http://172.18.161.6/identity/
The default users are: admin and demo
The password: secret
2016-08-09 03:28:11.972 | WARNING:
2016-08-09 03:28:11.972 | Using lib/neutron-legacy is deprecated, and it will be removed in the future
2016-08-09 03:28:11.972 | stack.sh completed in 5440 seconds.
เปิด browser ไปยัง http://172.18.161.6/dashboard
local.conf devstack2.exaple.com:
vagrant ssh devstack2
## change to root
sudo su -
useradd -d /opt/stack stack
echo "stack ALL=(ALL) NOPASSWD: ALL" >> /etc/sudoers
exit

## on normal vagrant user
sudo dnf update -y
sudo dnf install git -y
git clone https://git.openstack.org/openstack-dev/devstack
cd devstack

vi local.conf

[[local|localrc]]
HOST_IP=172.18.161.7
SERVICE_HOST=172.18.161.6
MYSQL_HOST=$SERVICE_HOST
RABBIT_HOST=$SERVICE_HOST
GLANCE_HOSTPORT=172.18.161.6:9292

ADMIN_PASSWORD=secret
MYSQL_PASSWORD=secret
RABBIT_PASSWORD=secret
SERVICE_PASSWORD=secret

## Neutron options
PUBLIC_INTERFACE=eth1
ENABLED_SERVICES=n-cpu,rabbit,q-agt

NOVA_VNC_ENABLED=True
NOVNCPROXY_URL="http://$SERVICE_HOST:6080/vnc_auto.html"
VNCSERVER_LISTEN=$HOST_IP
VNCSERVER_PROXYCLIENT_ADDRESS=$VNCSERVER_LISTENNOVA_VNC_ENABLED=True
NOVNCPROXY_URL="http://$SERVICE_HOST:6080/vnc_auto.html"
VNCSERVER_LISTEN=$HOST_IP
VNCSERVER_PROXYCLIENT_ADDRESS=$VNCSERVER_LISTEN
=========================
DevStack Component Timing
=========================
Total runtime   2383

run_process       7
pip_install     463
yum_install     1185
git_timed       603
=========================


This is your host IP address: 172.18.161.7
This is your host IPv6 address: ::1
2016-08-09 04:38:18.561 | WARNING:
2016-08-09 04:38:18.561 | Using lib/neutron-legacy is deprecated, and it will be removed in the future
2016-08-09 04:38:18.561 | stack.sh completed in 2383 seconds.
ให้ทำการแก้ไขด้วยการ เพิ่ม ค่าตัวแปรใน /etc/nova/nova.conf
sudo vim /etc/nova/nova.conf
## Add these two lines
ram_allocation_ratio=2
cpu_allocation_ratio=20
## Default value here is 16
Manage Devstack
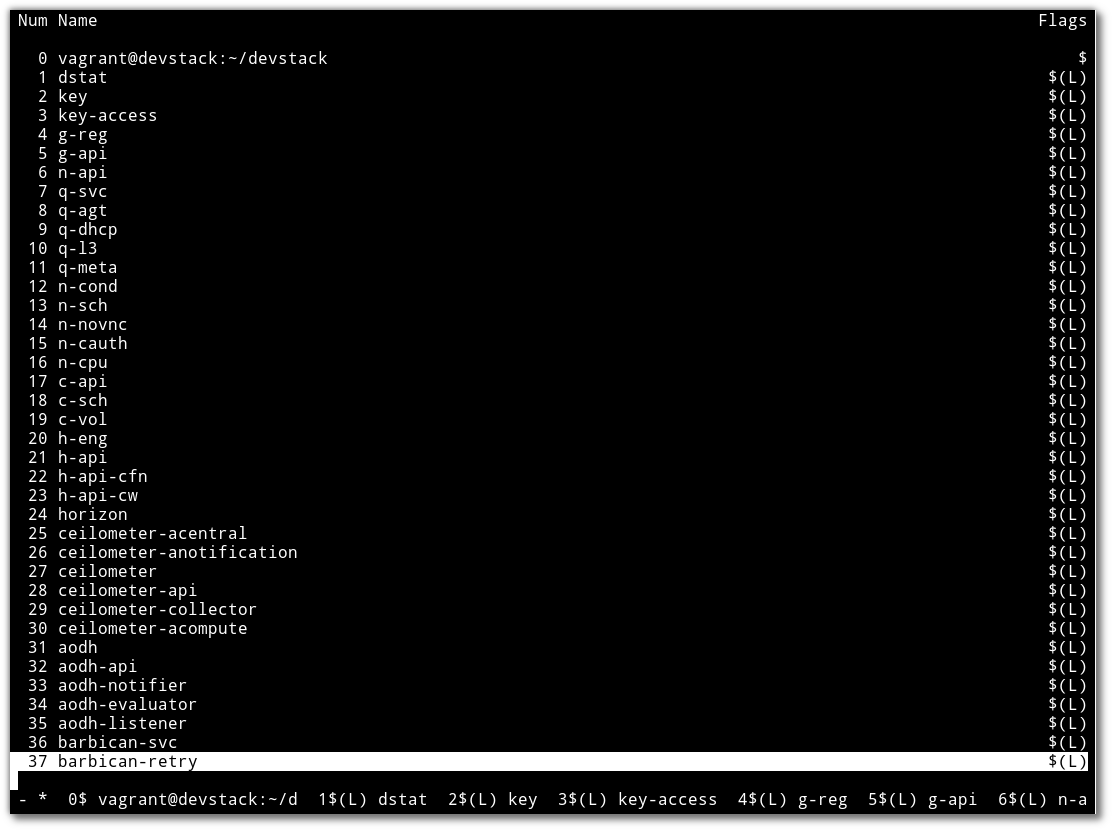
เนื่องจาก devstack run service ต่างๆ ใน screen session ไม่มี service command สำหรับการ start stop ัดังนั้นจะต้องเข้าไปใน screen session มีขั้นตอนดังนี้:
screen -list

There is a screen on:
      28843.stack     (Detached)
1 Socket in /var/run/screen/S-vagrant.
จะพบว่ามี screen session ชื่อ stack run อยู่:
screen -x stack
หลังจาก run แล้ว จะเข้าสู่ session ของ screen ดังรูปด้านล่าง ซึ่งจะต้องใช้คำสั่งในการจัดการ โดยให้พิมพ์คำสั่ง
ขึ้นต้นด้วย Ctrl+b แล้วตามด้วยค่าต่างๆ

คำสั่งแสดง list ทั้งหมด:
Ctrl a " (กด ctrl a แล้วปล่อย จากนั้นตามด้วย ")
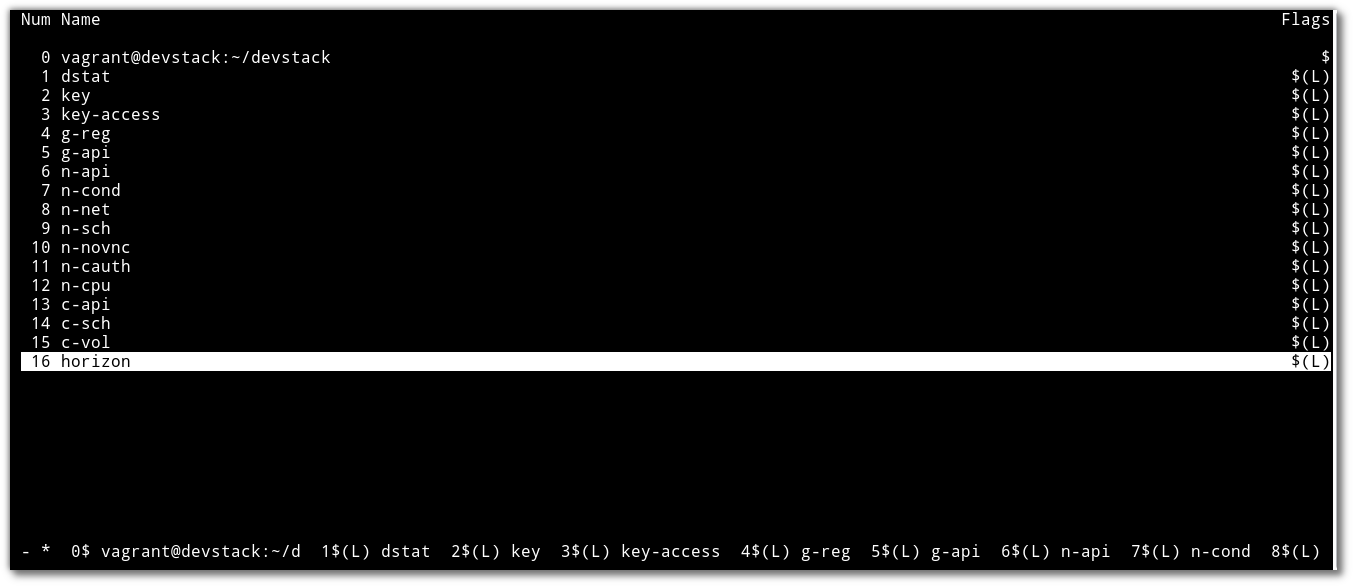
เลือก process:
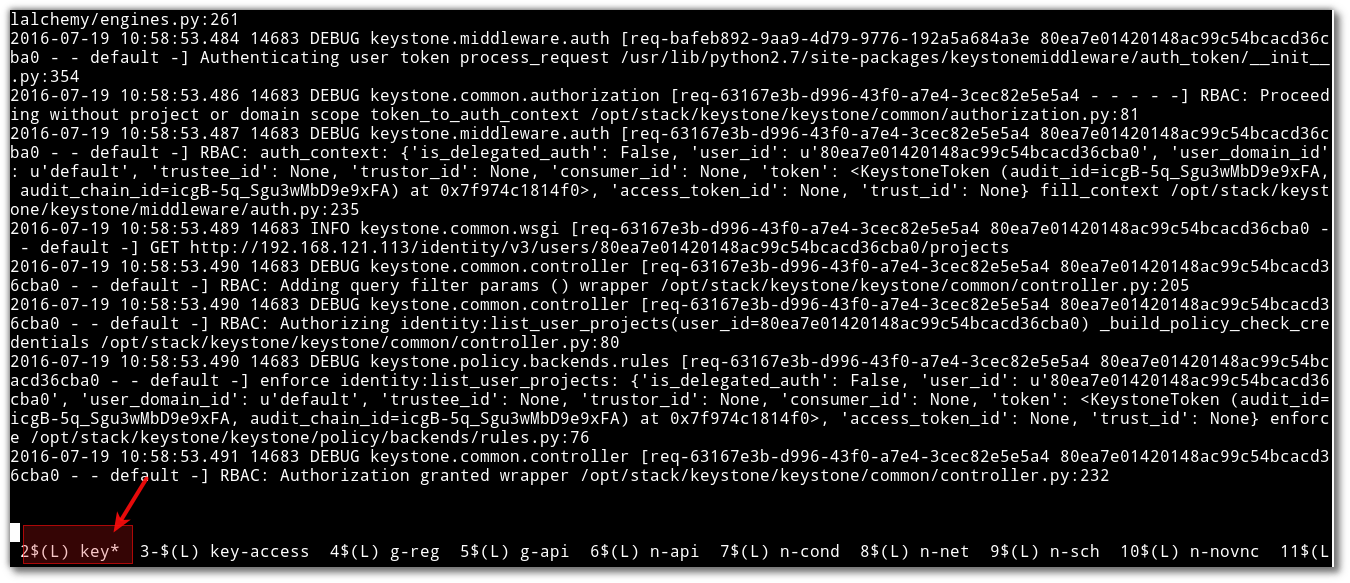
*. เลื่อน cursor ไปยัง process ที่ต้องการ แล้วจึงกด ``enter``เพื่อเลือกไปดู process เช่น เลือนไปยัง
process  2 ซึ่งเป็น process ของ keystone  ``enter``  เพื่อทำการ monitor ใหัสังเกตุดูบรรทัดล่างสุด
จะมี เครื่องหมาย ``*`` รูปด้านล่าง
*. สามารถกด ``Ctrl a N`` โดยที่ N หมายถึงหมายเลข ของ process จะทำให้เข้าไปยัง process นั้นทันที
ออกจาก stack:
screen -d
Add Devstack plugin
สามารถทำได้ด้วยการ เพิ่มเติมค่าใน local.conf
[[local|localrc]]
#OFFLINE=True

ADMIN_PASSWORD=password
DATABASE_PASSWORD=password
RABBIT_PASSWORD=password
SERVICE_PASSWORD=password

#1 Do not use Nova-Network
disable_service n-net
# Enable Neutron service
ENABLED_SERVICES+=,q-svc,q-dhcp,q-meta,q-agt,q-l3

#2 Heat service
enable_service heat h-eng h-api h-api-cfn h-api-cw

CEILOMETER_BACKEND=mongodb
CEILOMETER_NOTIFICATION_TOPICS=notifications,profiler

#3 enable plugin
enable_plugin ceilometer https://git.openstack.org/openstack/ceilometer
enable_plugin aodh https://git.openstack.org/openstack/aodh

enable_plugin neutron-lbaas https://git.openstack.org/openstack/neutron-lbaas
enable_plugin octavia https://git.openstack.org/openstack/octavia
enable_plugin barbican https://git.openstack.org/openstack/barbican

IMAGE_URLS+=",https://cloud-images.ubuntu.com/trusty/current/trusty-server-cloudimg-amd64-disk1.img"
IMAGE_URLS+=",http://cloud.centos.org/centos/7/images/CentOS-7-x86_64-GenericCloud-1606.qcow2"
Download complete file local.conf2:
หลังจากแก้ไขค่าแล้ว ให้ สั่งคำสั่งดังนี้
./unstack.sh
vi local.conf
./stack.sh
Note
ค่าที่อยู่ใน local.conf เป็นการสั่งให้ติดตั้ง service และ plugin แต่ยังไม่มีการ preconfig
devstack จะทำการสร้าง network ไว้ให้เป็นตัวอย่างที่ 10.0.0.0/24
หลังจากที่สำเร็จ จะได้ผลลัพท์:
=========================
DevStack Component Timing
Total runtime 5440
run_process 84 test_with_retry 4 pip_install 742 restart_apache_server 18 wait_for_service 13 yum_install 1219 git_timed 1911 =========================
This is your host IP address: 172.18.161.6 This is your host IPv6 address: ::1 Horizon is now available at http://172.18.161.6/dashboard Keystone is serving at http://172.18.161.6/identity/ The default users are: admin and demo The password: secret 2016-08-09 03:28:11.972 | WARNING: 2016-08-09 03:28:11.972 | Using lib/neutron-legacy is deprecated, and it will be removed in the future 2016-08-09 03:28:11.972 | stack.sh completed in 5440 seconds.
Total runtime 2872
run_process 103 test_with_retry 3 pip_install 314 restart_apache_server 19 wait_for_service 14 yum_install 182 git_timed 1006 =========================
This is your host IP address: 192.168.121.113 This is your host IPv6 address: ::1 Horizon is now available at http://192.168.121.113/dashboard Keystone is serving at http://192.168.121.113:5000/v3/ The default users are: admin and demo The password: password 2016-07-19 13:29:54.781 | WARNING: 2016-07-19 13:29:54.781 | Using lib/neutron-legacy is deprecated, and it will be removed in the future 2016-07-19 13:29:54.781 | stack.sh completed in 2872 seconds.
ทดสอบ screen -x stack และ list ด้วย Ctrl a "
ทดสอบโดย browser http://192.168.121.113/dashboard เพื่อดูเมนู ที่เปลี่ยนไป จากรูปจะเห็นค่า
config ของ network ที่ devstack เตรียมไว้ให้
Network Menu
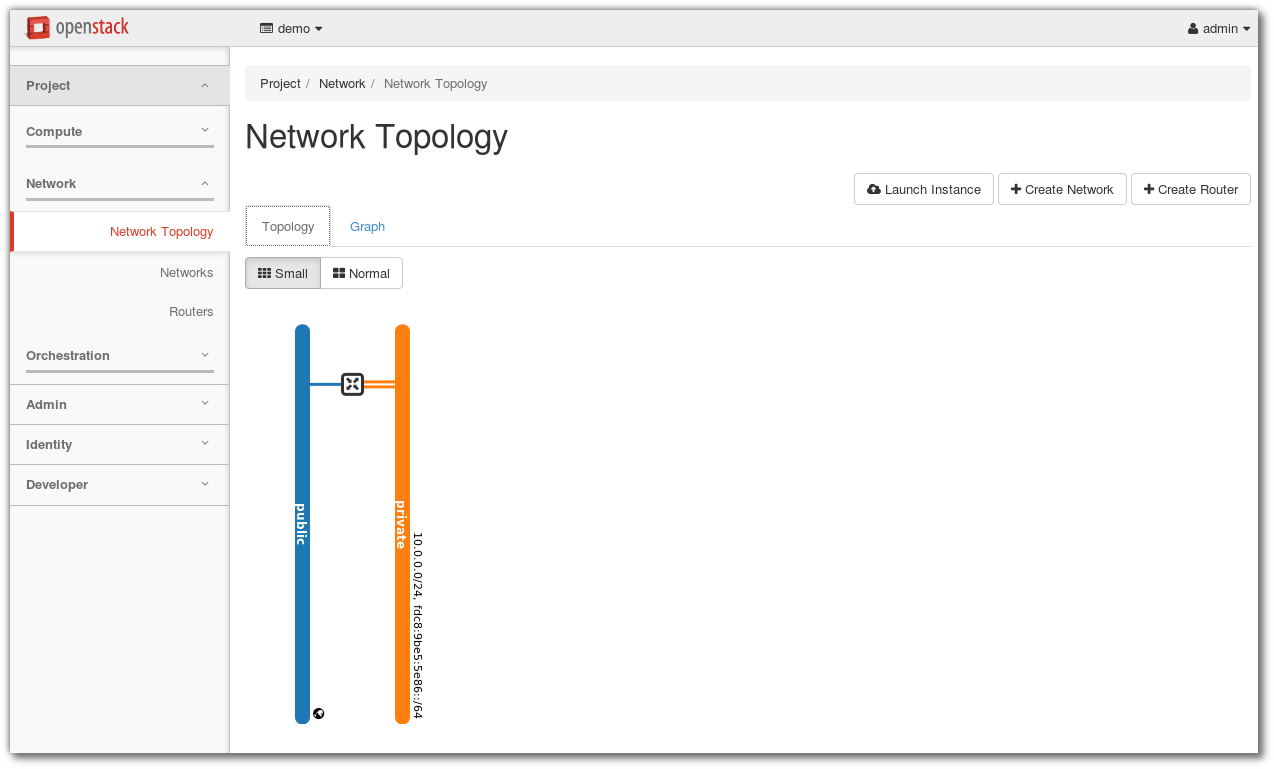
Heat Orchestration Menu

Compute Menu
Note
เมื่อเสร็จแล้วต้องการ สิ้นสุด ให้ ./unstack.sh ทุกครั้ง แล้วค่อย stack.sh ใหม่
Ctrl a d      (exit from screen session)
./unstack.sh
Neutron Network Default Settings
ค่า default ของ network ที่สร้างหลังจาก ที่ enable neutron โดยมี openswitch เป็นคนสร้างให้ เป็นค่า
default เนื่องจากเราไม่ได้ปรับแต่ค่าตัวแปรใดๆใน local.conf ให้พิมพ์คำสั่ง openvswitch ovs-vsctl show:
sudo ovs-vsctl show
66a8c5c3-6f2c-41a3-9756-9ac89faf1628
    Manager "ptcp:6640:127.0.0.1"
        is_connected: true
    Bridge br-ex
        Port "qg-237cb003-ee"
            Interface "qg-237cb003-ee"
                type: internal
        Port br-ex
            Interface br-ex
                type: internal
    Bridge br-tun
        Controller "tcp:127.0.0.1:6633"
            is_connected: true
        fail_mode: secure
        Port br-tun
            Interface br-tun
                type: internal
        Port patch-int
            Interface patch-int
                type: patch
                options: {peer=patch-tun}
    Bridge br-int
        Controller "tcp:127.0.0.1:6633"
            is_connected: true
        fail_mode: secure
        Port br-int
            Interface br-int
                type: internal
        Port "tap7ee7f8f3-62"
            tag: 1
            Interface "tap7ee7f8f3-62"
                type: internal
        Port "qr-d9f37ff9-d4"
            tag: 1
            Interface "qr-d9f37ff9-d4"
                type: internal
        Port "qr-d7da2f54-f0"
            tag: 1
            Interface "qr-d7da2f54-f0"
                type: internal
        Port patch-tun
            Interface patch-tun
                type: patch
                options: {peer=patch-int}
    ovs_version: "2.5.0"
ดู interface ด้วย ip link:
$ ip link
1: lo: <LOOPBACK,UP,LOWER_UP> mtu 65536 qdisc noqueue state UNKNOWN mode DEFAULT group default qlen 1
    link/loopback 00:00:00:00:00:00 brd 00:00:00:00:00:00
2: eth0: <BROADCAST,MULTICAST,UP,LOWER_UP> mtu 1500 qdisc fq_codel state UP mode DEFAULT group default qlen 1000
    link/ether 52:54:00:19:c1:e0 brd ff:ff:ff:ff:ff:ff
3: ovs-system: <BROADCAST,MULTICAST> mtu 1500 qdisc noop state DOWN mode DEFAULT group default qlen 1
    link/ether 1e:33:d0:b4:57:f9 brd ff:ff:ff:ff:ff:ff
4: br-tun: <BROADCAST,MULTICAST> mtu 1500 qdisc noop state DOWN mode DEFAULT group default qlen 1
    link/ether ae:0f:68:a5:a6:48 brd ff:ff:ff:ff:ff:ff
7: br-int: <BROADCAST,MULTICAST> mtu 1500 qdisc noop state DOWN mode DEFAULT group default qlen 1
    link/ether 8a:24:e0:d5:03:42 brd ff:ff:ff:ff:ff:ff
9: br-ex: <BROADCAST,MULTICAST,UP,LOWER_UP> mtu 1500 qdisc noqueue state UNKNOWN mode DEFAULT group default qlen 1
    link/ether fe:8e:5d:8c:1c:40 brd ff:ff:ff:ff:ff:ff
11: virbr0: <NO-CARRIER,BROADCAST,MULTICAST,UP> mtu 1500 qdisc noqueue state DOWN mode DEFAULT group default qlen 1000
    link/ether 52:54:00:e8:8c:c7 brd ff:ff:ff:ff:ff:ff
12: virbr0-nic: <BROADCAST,MULTICAST> mtu 1500 qdisc fq_codel master virbr0 state DOWN mode DEFAULT group default qlen 1000
    link/ether 52:54:00:e8:8c:c7 brd ff:ff:ff:ff:ff:ff